Internet Filing within Keytime Tax Professional
What can I file online with Keytime Tax Professional?
Keytime Tax Professional allows you to file Original and Amended returns for Individuals and Partnerships for the tax years accepted by HMRC's gateway - as of September 2010 this is the years 2008/09 and 2009/10.
Filing in Tax Proffessional: Overview
Once you have completed the tax return go to the Tools menu and select Internet Filing Management RDE.
This will display a screen like the one below:
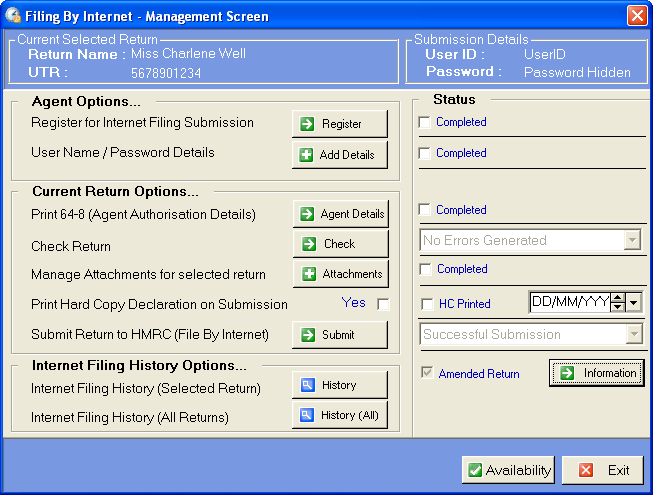
Return name / UTR - current client's details
User ID / Password - saved filing credentials
Agent Options
Register - Instructions for registering with HMRC / optional tickbox to mark completed
Add Details - Where you can enter your filing credentials / optional tickbox to mark completed
Current Return Options
Agent Details - Print a 64-8 form for this client / optional tickbox to mark completed
Check Return - Validate the tax return / results of last validation
Attachments - Add and manage PDF attachments / optional tickbox to mark completed
Print Hard Copy Declaration on Submission - Turn on prompt to print Hard Copy / date the last Hard Copy was printed
Submit - Proceed to validate return print hard copy and file online / results of last submission
Internet Filing History Options
History - View filing history for this return
History (All) - View filing history for all tax returns
Amended Return - Identifies if submitting as an amended copy / detailed information on the amendment
Availability - Check for HMRC announcements re: availability of online services
Exit - Close Internet Filing Management
Entering the User ID and Password for online submissions
If you are running the professional version you have two ways of entering the User ID and Password.
- Click on the Add Details button and then tick I am an agent before entering the User ID and Password. This will automatically remember your password for all tax returns
- Click Submit and enter the User ID and Password as a one-off for each return.
If you are running the personal version of the software only the second option is available.
Validating the return
To validate the return against the most common errors click the Check button. This will launch a screen which will classify entries onto the return into three categories:
- Fail - The validation will detect certain missing values that are mandatory for online filing and will also detect where some boxes have been calculated incorrectly.
- Warning - The validation will warn you in some circumstances when the entry may be valid but it is common to make an error. A warning will not prevent online filing but you should still make sure the box is correct before proceeding.
- Pass - The validation has not detected anything wrong with these boxes.
To view the reasons why boxes have failed or received a warning click the Details button. Then click Print and then Preview to view a full report on screen.
A second validation is run immediately before printing the hard copy or submitting online. This is the same as the previous validation with some extra checks that are specific to online filing.
Adding attachments
- On the Internet Filing Management screen click the Attachments button.
- Select the attachment by clicking the blue button to the right of the Selected File box.
- Browse for the PDF file highlight it and click the Open button.
- The name of the selected attachment will be shown in the Attachment Name box. You can adjust the name if you wish but any non-alphanumeric characters (including spaces) will be stripped from the filename.
- Click the Attach button to attach the PDF file to the return for submission. A copy of each selected PDF file will be saved into a dedicated attachments folder.
- Once the PDF file has been attached to the return it will be listed in Step 3 of the Attachments screen. This allows you to see a list of all files attached to the return.
- To view or amend details relating to various attachments or to preview an attachment: Double-click the attachment in the list to bring up the attachment details form.
- To edit the details click the Edit button type in the changes and click Save.
- The file size for this attachment will be displayed on the Attachment Details form
- Click the Preview button to open the attachment for viewing.
- Click the Return button to return back to the main Manage Attachments screen. - To remove any of the attachments from the Added Attachments list click on the name of the attachment and click the Remove button (this will also delete the file from the attachments folder but it will not delete the original PDF file from where it was selected)
- Once all attachments have been added click the Continue button to be returned to the Internet Filing Management screen.
- You can return back to the Manage Attachments form at any time before submission by clicking the Attachments button.
- When you are completely satisfied that you have added all the attachments you can tick the Completed status box on the Internet Filing Management screen.
Please note that this is just for you to keep track of your progress and the attachments will be included on submission even if the Completed status has not been ticked.
Printing the hard copy
If you are an agent and preparing this return for someone else you will need to obtain a signed hard copy of the return.
To do this within the Internet filing screen click Submit and then click Next through the subsequent screens. When entering your details you would need to tick I am an agent to receive the hard copy prompt.
Then after a successful pre-filing validation you will receive a button to Print Hard Copy Of Tax Return. Depending on your settings you may also receive a popup prompt to print the hard copy.
Either clicking the Print Hard Copy Of Tax Return button or Yes on the popup will allow you to produce the hard copy.
Submitting the return to HMRC
Once you are ready to file the return to HMRC click Submit and then click Next through the subsequent screens; ensuring that the internet filing credentials are entered correctly.
After a successful pre-filing validation if you are an agent you will be expected to tick Enable Submit. I confirm I have a signed Hard Copy and Declaration. This will enable the Submit Tax Year button. If you are not an agent the button should already be active upon a successful validation.
After you click the Submit Tax Year button Tax Professional will begin to submit the return to HMRC. You should not close the subsequent screen until you receive a response from HMRC to say whether the return has submitted successfully or not. Please note that closing this screen may not cancel the submission but may prevent Tax Professional from receiving (and subsequently recording to the filing history) the response from HMRC.
Viewing the internet filing history
On the Internet Filing Management screen click the History button to view filing history for the current return or History (All) to view the history for all returns. By default all available filing history will be displayed on the subsequent screen. You can then re-order and filter the necessary information.
Reordering
To reorder the records select one of the following options from the panel labeled Order History Details By:
- Form Name
- UTR
- Date / Time
- IR Mark
- Log No
Use the Order Ascending tickbox to specify whether you want the list to appear in ascending or descending order.
Filtering
To filter the records select Show Internet Filing History details between the following dates
Then specify the start and end dates which will restrict the display to submissions that took place between the selected dates.
Displaying/printing HMRC response
To view the detailed HMRC response select the relevant submission log (by left-clicking on that row in the list) then click Show. This will create a pop-up display of the filing record.
To print the details click Print; either from the pop-up screen or at the bottom of the main filing history screen.